Electricity
Guide to Turrets and Traps in Rust
Auto turrets, shotgun traps, flame turrets, SAM sites, and bear traps. Power requirements, setup, placement, and raid defense tactics.
Auto turrets, shotgun traps, flame turrets, SAM sites, and bear traps. Power requirements, setup, placement, and raid defense tactics.
Turrets and traps form the active defense layer of a Rust base. They operate while you sleep, punch intruders during raids, destroy equipment, and buy time for you or teammates to respond. Understanding each trap type, its requirements, and optimal placement converts a base from a target into a fortress.
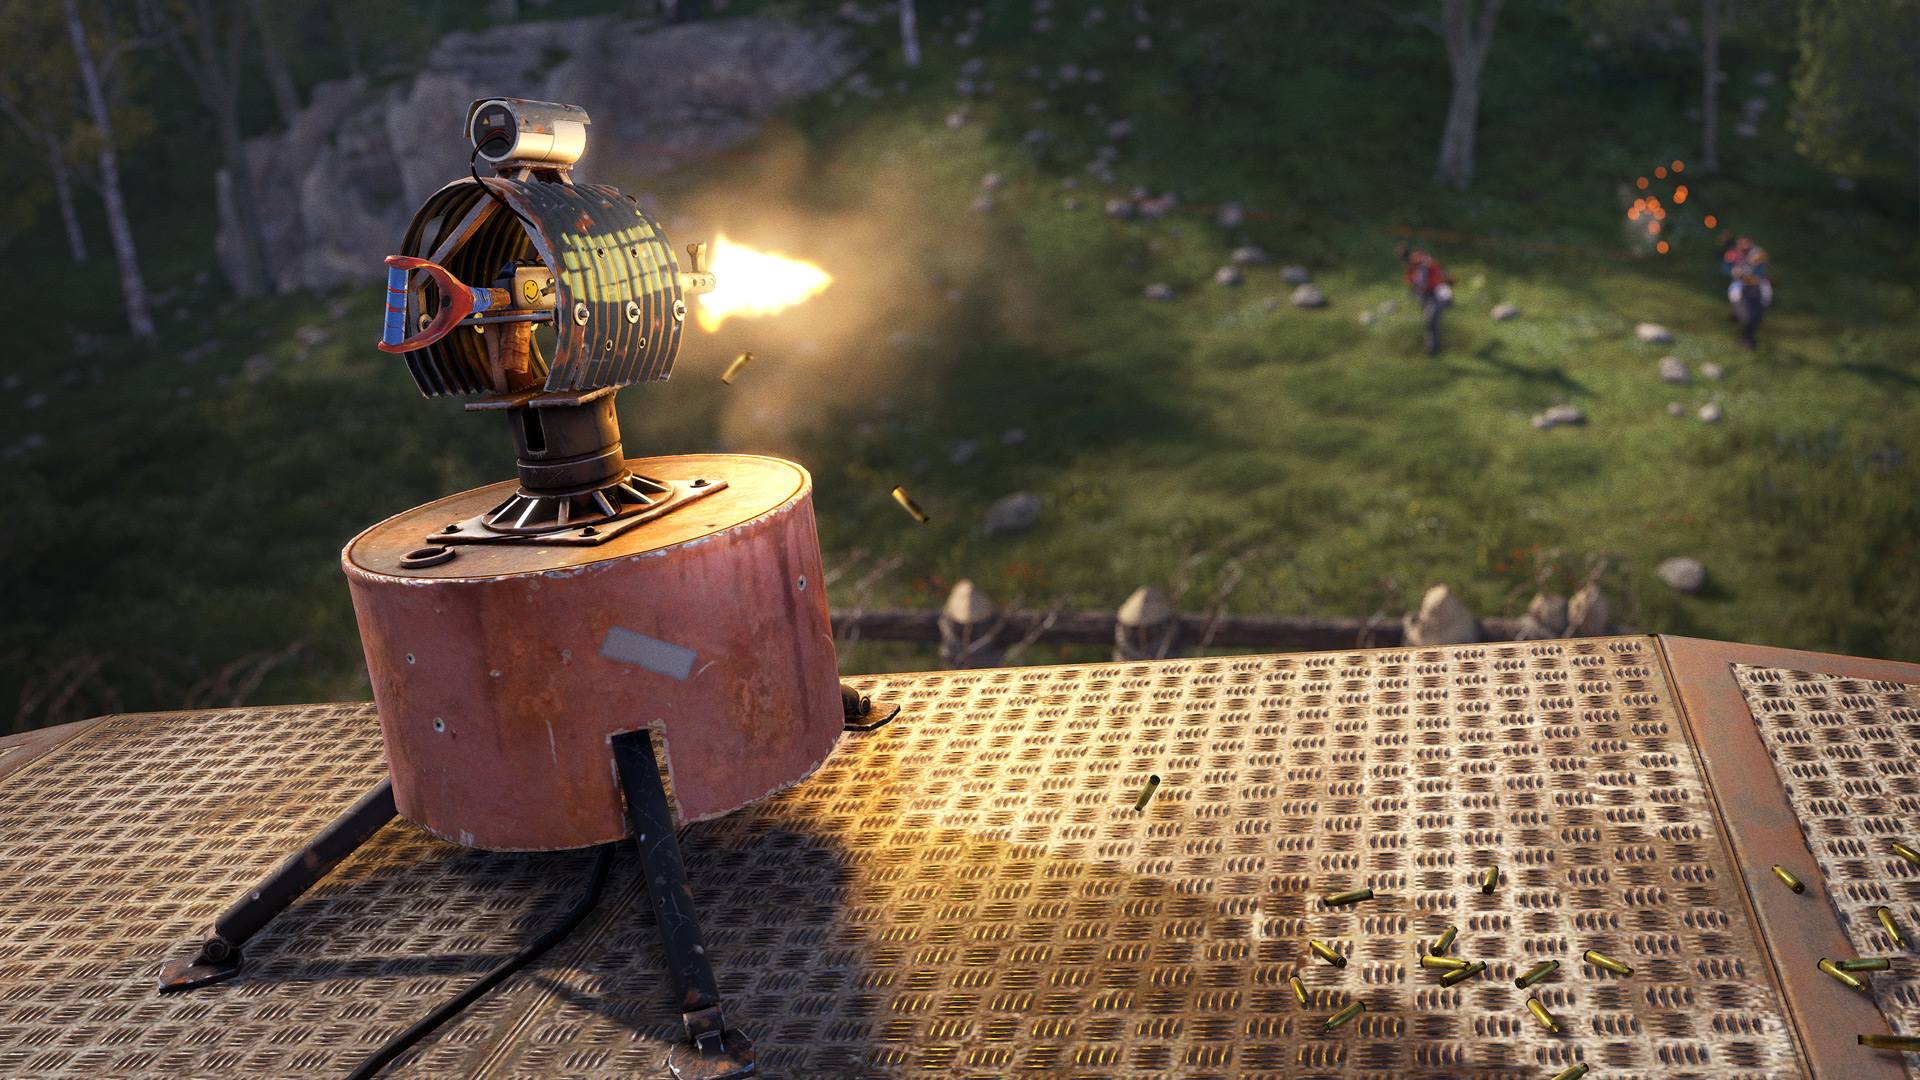
The auto turret is the most powerful electrical defensive tool in Rust. It automatically detects and engages unauthorized players within its detection radius and fires until the target is eliminated or leaves range.
Power Requirements - The auto turret requires a minimum of 10 rW to function. Below 10 rW, it remains inactive regardless of targets. At 11 rW or higher, its output ports (Has Target, Low Ammo, No Ammo) activate, enabling advanced circuit integration. A single large battery reliably supports 8 to 10 auto turrets simultaneously when paired with adequate charging from renewable sources.
Setup and Configuration - Place the turret in its desired position. Load it with a weapon from your inventory (assault rifles, M39, SAR, or Python). Fill its magazine with appropriate ammunition. Open the turret's interface and authorize all players who should be exempt from fire. Only authorized players are safe. Unauthorized players are engaged on sight.
Detection and Firing Arc - Auto turrets have a specific detection cone. When placing, white lines indicate the detection field forming a V shape pointing in the firing direction. Turrets cannot see behind themselves or outside their detection arc. Position turrets toward doors, corridors, and entry points where raids occur. Stagger multiple turrets to cover entrance bottlenecks and prevent blind spots.
Ammunition and Maintenance - Turrets consume ammunition rapidly during active fire. High-quality ammunition such as rifle ammo is preferred but costly. Some players use lower-tier ammo to reduce costs. Monitor ammo levels and refill before servers reset or wipes. A turret burning through a weapon's magazine in a single raid is common.
Authorization Management - Keep authorization lists current. Teammates who leave your group should be removed from tool cupboard authorization, but they may remain authorized on turrets individually. Always manage turret auth lists separately from TC auth. A former teammate who knows your base layout and has turret exemption poses severe security risk.
Check turret authorization lists weekly. Remove any players no longer part of your team. Forgotten auth lists have resulted in bases being invaded by people with prior knowledge and exemptions. Maintain separate authorization from your tool cupboard.
The shotgun trap is a passive, unpowered defensive device that fires 12 gauge ammunition at unauthorized players who trigger it. Unlike auto turrets, shotgun traps require no electricity, making them deployable in any location with wall or ceiling space.
Position shotgun traps behind airlocks, under jump-up positions, in loot rooms, and at corners where raiders must pass close by. A single shotgun trap deals significant damage and forces raiders to spend time draining it. Multiple traps in sequence inflict heavy casualties. Shotgun traps are loud, immediately revealing their location, but their damage justifies the intel loss.
Load shotgun traps with 12 gauge ammo and authorize yourself. Unlike auto turrets that distinguish friends from foes, shotgun traps fire at anyone they trigger, so place them behind your own defenses or lock them down with tool cupboards.
The flame turret sprays napalm at unauthorized players within its detection radius, dealing continuous damage and potential environmental damage through fire pools. Flame turrets operate on low-grade fuel rather than requiring power. They excel in narrow corridors and tight spaces where fire accumulates and forces enemies backward or into other defenses.
Install flame turrets in airlocks, narrow hallways, and rooms where close-quarter combat is inevitable. The short detection range compared to auto turrets makes them most effective in confined areas. Fuel consumption is moderate with proper rationing.
SAM (Surface-to-Air Missile) sites automatically launch missiles at hostile aircraft, including minicopters, scrap helicopters, and the Patrol Helicopter. They require electrical power and SAM ammo to operate. Optimal placement is on roofs, outer walls, or elevated positions with clear sky access.
SAM sites protect against aerial raiding and helicopter drops onto your compound. On servers where air raids are common, SAM site investment is essential. Multiple SAM sites create redundancy against helicopter attacks.
Bear traps immobilize players who step on them, rooting them in place for several seconds. A trapped player becomes stationary and vulnerable to your turrets, traps, or direct fire. Place bear traps on high-traffic walking paths: directly in front of doors, at ladder tops, around entrance ramps, and at corners where raiders must move predictably.
A bear trap effectively converts raiders into sitting ducks for your auto turrets. Combine traps with layers of defenses for maximum effectiveness. Players can free themselves by holding E, but this takes time and leaves them exposed.
Advanced players combine auto turrets with HBHF sensors and logic gates to activate turrets only when threats are present. This saves ammunition and power consumption when the base is not under attack. An HBHF sensor detecting unauthorized players triggers power to turrets through an AND gate combined with a timer, activating nighttime defense automatically. See the Advanced Electricity guide for detailed automation setups.
Activate build mode before your first raid to verify detection arcs and firing angles. Test if all entry points are covered and adjust turret positions as needed. Poor placement is revealed during actual raids when turrets miss critical angles.