%20Screenshots/Rust%20-%20SMG.jpg)
Combat
Complete Weapons Guide for Rust
Every weapon: damage, fire rate, cost, ammo, attachments, tactical use, and wipe phase recommendations.
Every weapon: damage, fire rate, cost, ammo, attachments, tactical use, and wipe phase recommendations.
Rust weapons exist on a progression ladder. You start with a rock and upgrade through tools, bows, pistols, rifles, and military-grade weapons. Each tier of weapon requires more resources and investment, but provides better performance. Understanding which weapon to use in which situation determines whether you survive encounters or lose your gear to better-informed enemies.
Weapon selection is situational. An AK is useless for monument farming. A crossbow is useless for late-wipe PvP. The best weapon is always the one that matches your current situation, resources, and threat level. This guide covers every weapon, its strengths, its weaknesses, and when to deploy it. For advanced combat tactics, see our complete PvP combat guide.
Primitive weapons dominate wipe day and the first few hours. They are free to craft with starting resources, infinitely renewable, and still deadlier than most players realize. These weapons require no blueprints and minimal resources, making them available to every player within minutes of spawn.
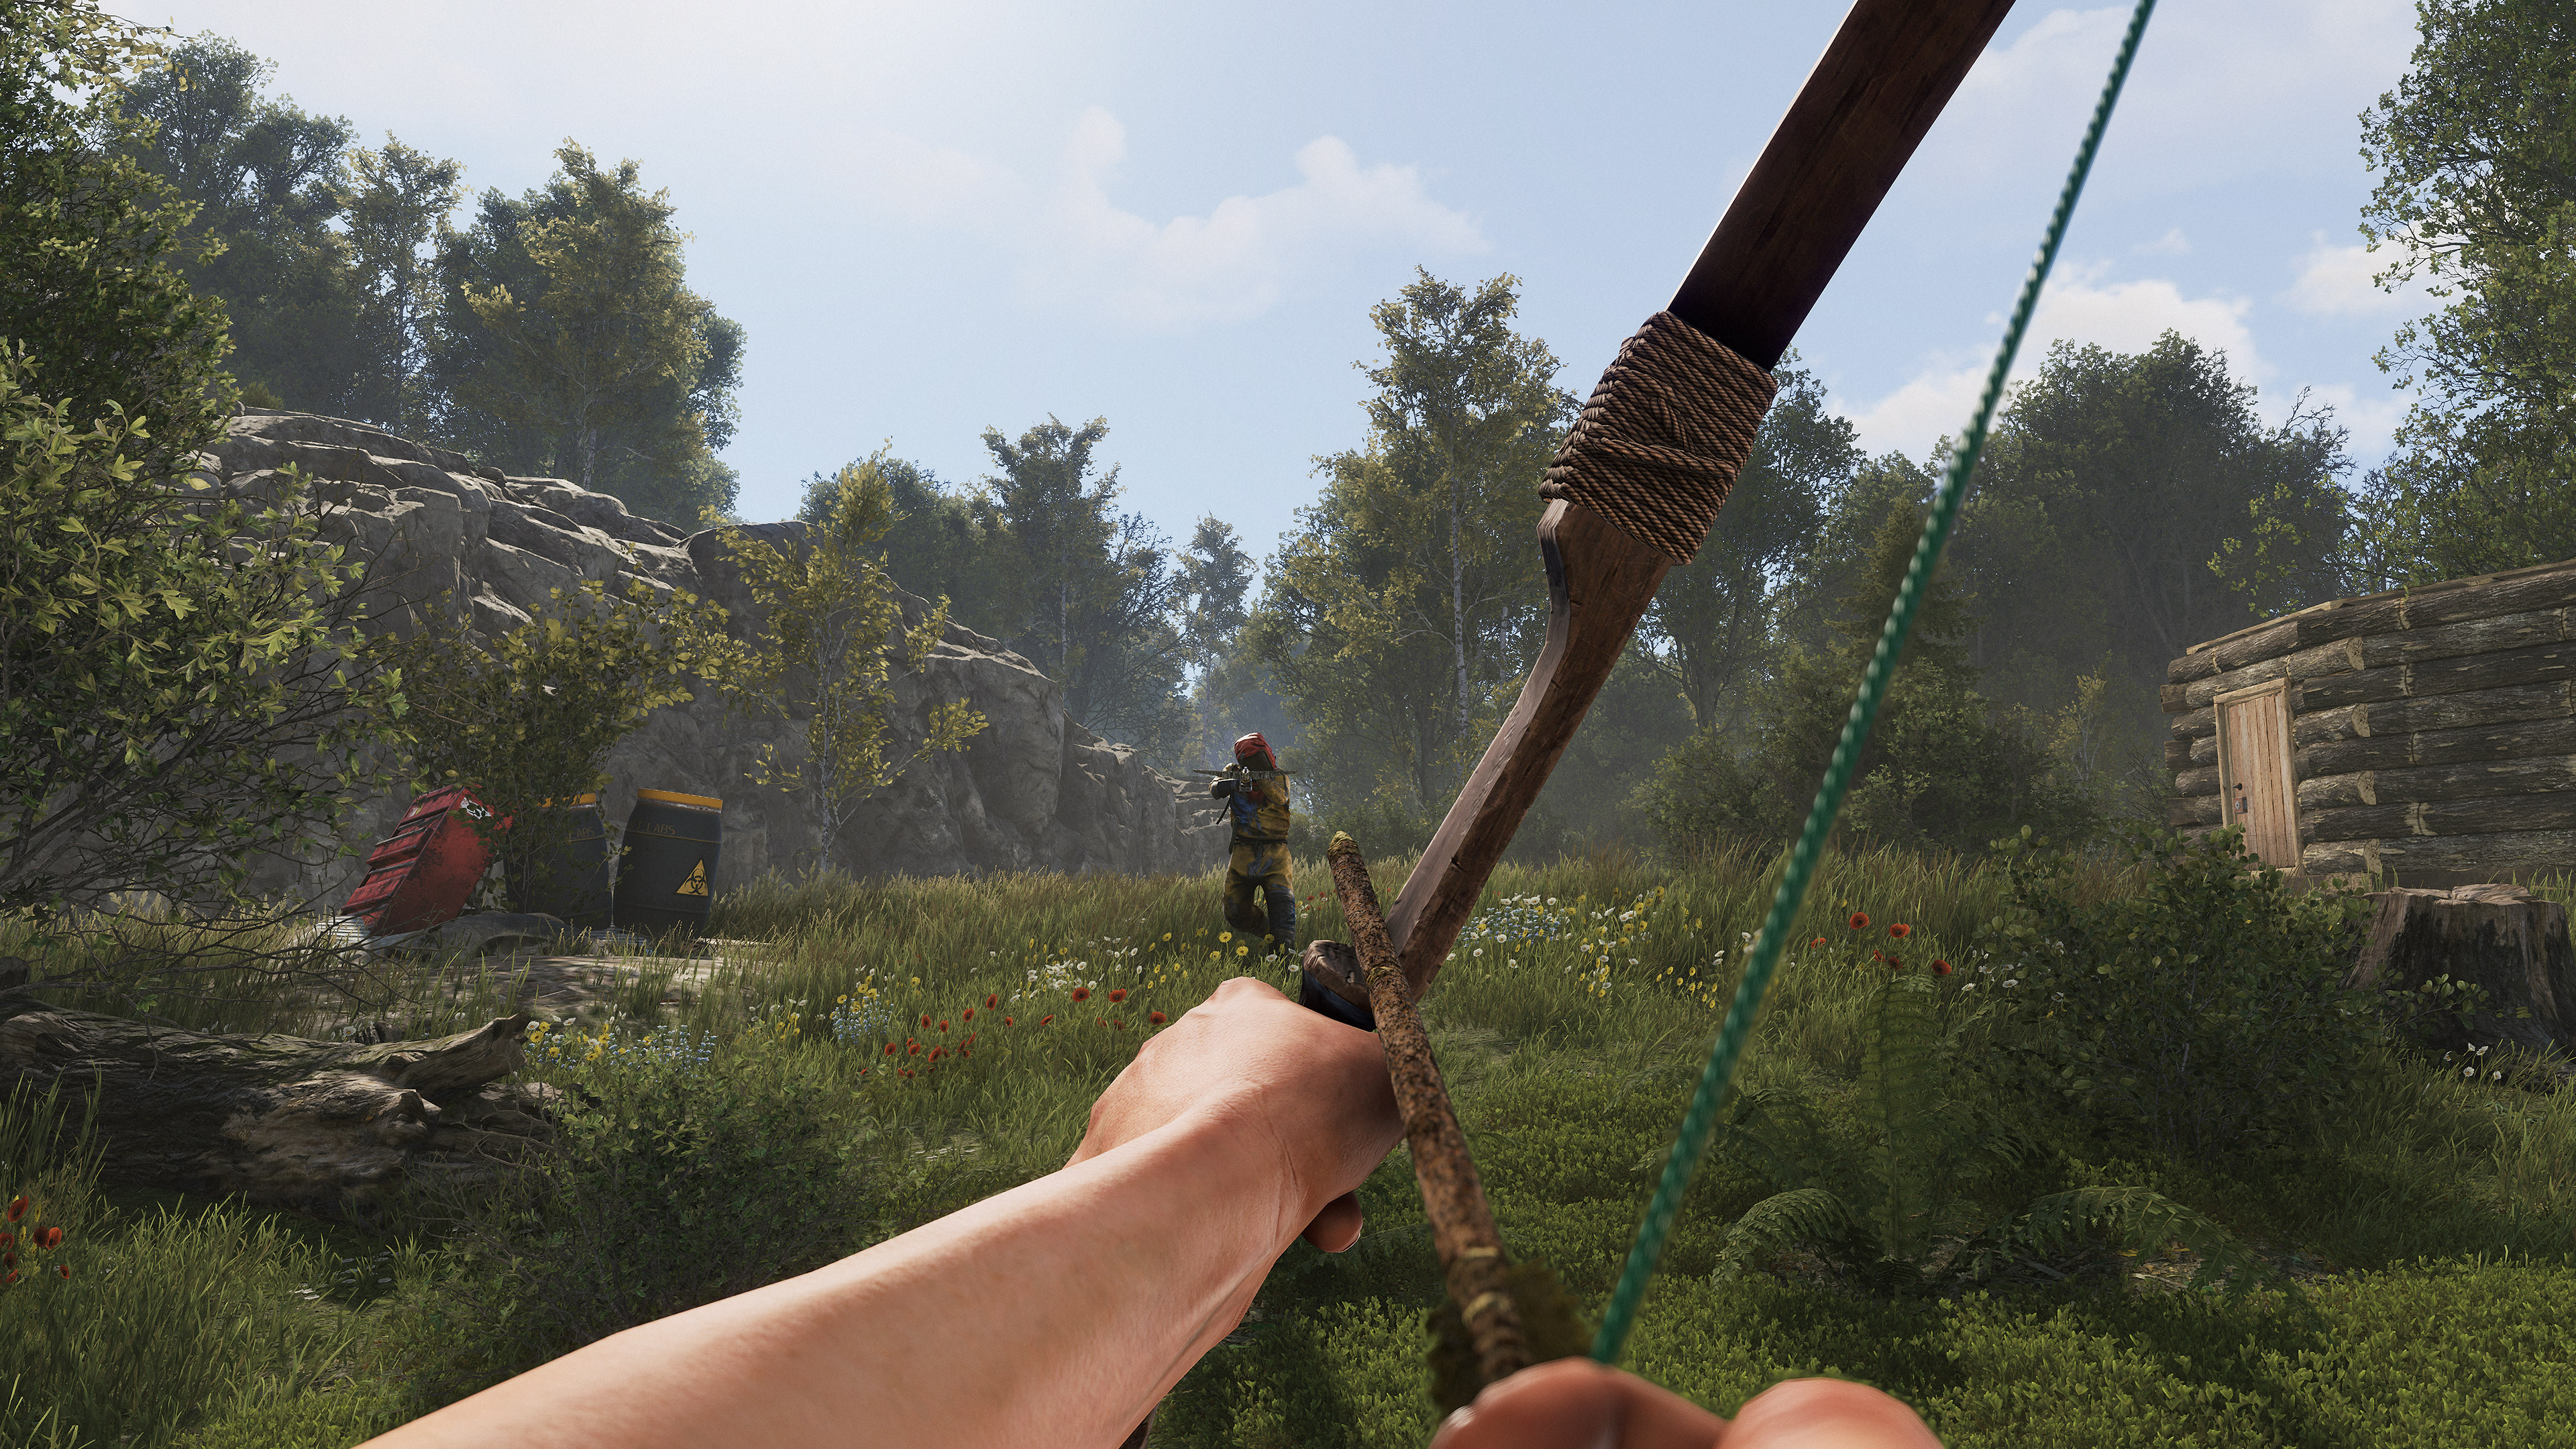
![]() Hunting Bow (200 wood + 50 cloth, no blueprint required)
Hunting Bow (200 wood + 50 cloth, no blueprint required)
Damage: 50 to chest, 80 to head, additional bleed damage. Effective range: 100 meters with significant arrow drop beyond 50 meters. Drawing time: approximately one second. The hunting bow is your first real weapon. Two headshots kill most clothed players early wipe. The challenge is hitting headshots consistently. Arrow flight time is slow enough that moving targets require leading. Practice on practice servers before relying on bow duels.
When to use: Wipe day through first hour. Primary weapon until you find metal fragments or a revolver. Effective for solo plays, door-camps, and early ambushes.
![]() Crossbow (200 wood + 75 metal frags + 2 rope)
Crossbow (200 wood + 75 metal frags + 2 rope)
Damage: 60 per shot with wooden arrows, better accuracy than hunting bow. Effective range: 150+ meters with minimal drop. Fire rate: slower than hunting bow. Unique mechanic: can reload while sprinting at full speed without interrupting movement. This is enormous. You can kite enemies while reloading. Wooden arrows are free to make, bone arrows require bone fragments for stronger damage.
Ammunition: wooden arrows (free) or bone arrows (stronger, requires bone fragments). Wooden arrows are adequate for early wipe. The reload-while-sprinting mechanic makes the crossbow exceptional for kiting.
When to use: Wipe day when you have slight metal fragment access. One of the best weapons relative to cost on the entire ladder. Devastating in the hands of an accurate player. Kiting with reload-while-sprinting wins fights you should lose. Better than compound bow early game.
![]() Eoka Pistol (75 wood + 30 metal frags)
Eoka Pistol (75 wood + 30 metal frags)
Damage: 180 to chest, 210 to head. Can one-shot clothed players. Ammunition: handmade shells (craftable, 10 each). Unique mechanic: fires at a random interval. You pull the trigger and it fires randomly between 0.5 and 2 seconds later. This unreliability makes it terrible for fair fights but exceptional for ambushes and door-camps. Do not use against experienced players who expect the mechanic.
When to use: Door-camp weapon. Ambush weapon. The randomness makes it unsuitable for duels, but in a surprise encounter, the one-shot potential is devastating. Some players intentionally carry an Eoka as a secondary surprise weapon even in mid-wipe roaming.
![]() Compound Bow (100 wood + 50 metal frags + 2 rope, blueprint required)
Compound Bow (100 wood + 50 metal frags + 2 rope, blueprint required)
Damage: significantly higher per shot than hunting bow when fully charged. Effective range: superior to hunting bow due to higher velocity. Unique mechanic: charging. Hold the draw and release when ready for a charged shot. Movement during charge cancels the charge entirely. You must stand still to charge. This limitation makes it worse than crossbow for kiting.
When to use: Mid-game if you find the blueprint early. Better than hunting bow in almost every way except for the requirement to stand still. Superior for positioned fighting, poor for kiting. Less valuable than crossbow.
Pistols bridge the gap between primitive weapons and rifles. They use pistol ammunition which is affordable to craft, and most are available at Workbench Level 1. Pistols are rarely your primary weapon late game, but they are excellent secondaries and acceptable primaries mid-game. Understanding pistol mechanics prepares you for SMG spray control.
![]() Revolver (125 metal frags + 25 cloth + 1 pipe, Workbench Level 1)
Revolver (125 metal frags + 25 cloth + 1 pipe, Workbench Level 1)
Damage: 40 per shot. Magazine: 8 rounds. Fire rate: slow, manual for each shot. Cost: very cheap. The revolver is your first firearm after bows. It is reliable and straightforward. Low damage and slow fire rate mean it loses most fair fights. Best used as a stepping stone while you farm for better weapons. Accuracy is good, allowing tap-firing at range.
When to use: Only as a temporary weapon during your transition to SMGs or better rifles. Not competitive at any wipe phase for PvP. Acceptable for monument farming when you cannot afford better.
![]() Semi-Automatic Pistol (P250) (450 metal frags + 1 semi body + 1 pipe, Workbench Level 1)
Semi-Automatic Pistol (P250) (450 metal frags + 1 semi body + 1 pipe, Workbench Level 1)
Damage: 30 per shot. Magazine: 10 rounds. Fire rate: semi-auto. Not competitive against SMGs or better pistols in direct fights. Acceptable for farming since it does not require as much ammo per kill. Used by players with limited resources. Moderate accuracy.
When to use: Farming rotations when you need a gun but cannot afford an SMG. Rarely competitive for PvP. Better as a learning tool than a fighting tool.
![]() M92 Pistol (found in crates, not craftable)
M92 Pistol (found in crates, not craftable)
Damage: 35 per shot. Magazine: 15 rounds. Fire rate: highest of any pistol, semi-auto rapid fire capability. Many players underestimate the M92 because it looks like a secondary. The large magazine combined with high fire rate makes it competitive against SMGs in close quarters. Experienced players carry M92 in lockers specifically for close-range base defense.
When to use: Excellent mid-game secondary when you find it in crates. Can hold its own in fights with superior positioning and spray control. Better than most would assume. Consider using as primary in close quarters.
![]() Python Revolver (450 metal frags + 1 pipe + 10 cloth, Workbench Level 2)
Python Revolver (450 metal frags + 1 pipe + 10 cloth, Workbench Level 2)
Damage: 60 per shot. Magazine: 6 rounds. Fire rate: slow. The Python is a high-damage, low-capacity weapon. Each shot counts. Accuracy is excellent, effective range is medium. The limited ammunition means missing is punishing. Rewards precise aim with high reward. Headshots are devastating.
When to use: Niche choice. Some players prefer the Python for the damage per shot. Excellent for stationary defense or if you are confident in your aim. Most players find SMGs more practical for general use. Situational for experienced players.
SMGs are the mid-game workhorses of Rust. They use pistol ammunition, which is cheap to produce, dominate close-to-mid range engagements, and provide the transition between primitive weapons and high-tier rifles. Every progression path includes an SMG phase. Most players consider SMG proficiency essential for survival. Learning SMG spray is foundational for later AK mastery.
![]() Custom SMG (9 HQM + 1 SMG body + 1 spring, Workbench Level 2)
Custom SMG (9 HQM + 1 SMG body + 1 spring, Workbench Level 2)
Damage: 25 per shot. Magazine: 30 rounds. Fire rate: one of the highest in the game, approx 600 RPM. Bullet velocity: poor. The Custom SMG is the cheapest SMG to craft and available earliest. High fire rate means high DPS at close range, but poor velocity makes it ineffective at distance. Recoil is moderate. Aimcone widens quickly with sustained fire.
When to use: Early roaming when you cannot afford to lose better gear. Base defense and close-quarters monument farming. Not suitable for open-field PvP beyond 30 meters. Excellent as a learning weapon for spray control.
![]() Thompson (10 HQM + 100 wood + 1 SMG body + 1 spring, Workbench Level 2)
Thompson (10 HQM + 100 wood + 1 SMG body + 1 spring, Workbench Level 2)
Damage: 37.5 per shot. Magazine: 20 rounds. Fire rate: 462 RPM. Bullet velocity: good. Recoil: manageable. The Thompson is the balanced SMG. It hits harder per shot than the Custom, maintains decent accuracy at range, and is affordable. Many players consider it one of the best value weapons in the entire game. The DPS is excellent, the recoil is learnable, and the cost is reasonable.
When to use: Mid-game primary weapon. Excellent for farming, roaming, and monument runs. Competitive in PvP fights up to 50 meters. Many professional players keep a Thompson as a backup gun even in late game.
![]() MP5A4 (300 metal frags + 10 HQM + 1 SMG body + 1 spring, Workbench Level 3)
MP5A4 (300 metal frags + 10 HQM + 1 SMG body + 1 spring, Workbench Level 3)
Damage: 37.5 per shot. Magazine: 30 rounds. Fire rate: 600 RPM. Bullet velocity: very good. Recoil: minimal. Accuracy: excellent. The MP5 is the best SMG in the game for most situations. The 30-round magazine means you can suppress multiple targets or sustain a fight longer. Low recoil makes it easy to control. The large magazine combined with high damage and low recoil makes it competitive even against rifles at medium range. Many aggressive players prefer MP5 to rifles because the hip-fire accuracy is superior.
When to use: Best mid-game to late-game SMG. Primary weapon for aggressive close-quarters players. Excellent for base defense. Some players keep an MP5 even after switching to rifles because the versatility and ease-of-use are unmatched. One of the most underrated weapons in late game.
Rifles dominate mid-to-late game PvP. They use 5.56 ammunition, provide superior range, and define the meta. Most competitive players transition to rifles as soon as Workbench Level 2 is accessible.
![]() Semi-Automatic Rifle (SAR) (450 metal frags + 1 semi body + 1 pipe + 1 spring, Workbench Level 2)
Semi-Automatic Rifle (SAR) (450 metal frags + 1 semi body + 1 pipe + 1 spring, Workbench Level 2)
Damage: 40 per shot. Magazine: 16 rounds. Fire rate: semi-auto. Effective range: excellent at all ranges up to 300 meters. The SAR is widely considered the best value weapon in the entire game. Easy to control, high damage, effective at range, and affordable. Tap-firing for controlled bursts or single shots allows accurate medium-range engagement. Hip-fire accuracy is decent for close range. Very low recoil.
When to use: Transition from SMGs to rifles. Primary weapon for farmers and roamers who cannot yet afford AKs. Excellent for monument runs and aerial missions. Competitive in PvP up to medium range. Many players keep a SAR even in late game because the consistency and ease-of-use are exceptional.
![]() Assault Rifle (AK-47) (50 HQM + 200 wood + 4 springs + 1 rifle body, Workbench Level 3)
Assault Rifle (AK-47) (50 HQM + 200 wood + 4 springs + 1 rifle body, Workbench Level 3)
Damage: 45 per shot. Magazine: 30 rounds. Fire rate: 450 RPM full auto. Bullet velocity: good. Recoil: very high. The AK is the most iconic weapon in Rust and the standard for high-tier PvP. High damage combined with 30-round magazine means massive burst potential. Full-auto capability allows either controlled spraying or single-tap farming. The recoil is extreme and requires serious practice to master. An experienced AK player dominates. A new AK player gets destroyed.
When to use: Late-game primary weapon once you have WB3 and materials. The standard for clan warfare, large-scale PvP, and raids. The recoil is learnable through practice.
![]() LR-300 Assault Rifle (found in military crates and helicopter drops, not craftable)
LR-300 Assault Rifle (found in military crates and helicopter drops, not craftable)
Damage: 40 per shot. Magazine: 30 rounds. Fire rate: 500 RPM. Recoil: significantly less than AK. Aimcone: slightly wider than AK at range. The LR-300 is the AK's easier-to-use counterpart. For players who prioritize consistency over raw damage ceiling, the LR-300 is superior. The lower recoil makes it more forgiving. The only downside is the slightly higher spread at distance, making it less optimal for extreme long-range tapping.
When to use: If you find it in crates, use it over an AK you have not practiced with. Excellent for learning spray control with less recoil punishment. Many top players use LR-300 over AK because consistency matters more than ceiling. Viable as primary even in late-game competitive play.
![]() M249 Light Machine Gun (found at Attack Helicopter and locked crates, not craftable)
M249 Light Machine Gun (found at Attack Helicopter and locked crates, not craftable)
Damage: 65 to chest, 130 to head. Magazine: 100 rounds. Fire rate: approximately 500 RPM. Bullet velocity: good. The M249 is widely considered the strongest gun in the game. The 100-round magazine is the defining feature. You can suppress multiple targets, spray through walls, sustain fire indefinitely, and sustain a team fight. Any player carrying an M249 has massive suppressive power. Downsides: weapon is extremely rare, takes serious effort to obtain, and the 100 rounds make repositioning slower. Ammunition consumption is enormous.
When to use: Late-wipe competitive play if you acquire one. Raids where you need sustained firepower. Defense scenarios where you control tight angles. Not worth risking unless defending or raiding with a team. Exceptional for holding compound during raids.
![]() Bolt-Action Rifle (1000 metal frags + 1 pipe + 1 rifle body, Workbench Level 3)
Bolt-Action Rifle (1000 metal frags + 1 pipe + 1 rifle body, Workbench Level 3)
Damage: 80 to chest, 130 to head. Magazine: 4 rounds. Fire rate: manual bolt cycle between shots. Effective range: superior to other rifles for long-range accuracy. The Bolt is a patience weapon. Sit at range, line up headshots, and force enemies to respect your angles. One headshot kills clothed players. Two shots kill geared players. The low fire rate means missing is catastrophic. The slow reload means you cannot recover from missing both shots. Requires exceptional aim and positioning.
When to use: Long-range defense. Sniper plays. Holding angles at distance. Excellent in stationary positions. Poor for aggressive plays or close-quarters. Best for team play where teammates cover close range.
![]() L96 Rifle (found in elite crates, not craftable)
L96 Rifle (found in elite crates, not craftable)
Damage: 80 to chest, 160 to head. Magazine: 5 rounds. Fire rate: manual bolt cycle. Effective range: superior to Bolt-Action due to higher velocity. The L96 is the highest-damage sniper. One headshot downs almost any player regardless of armor. The extra round compared to Bolt (5 vs 4) provides one extra chance. Extremely rare loot from elite locations. Better velocity means easier long-range shots.
When to use: If you find one in elite crates, you have obtained an exceptional weapon. Use it to hold long angles and secure distance advantage. Body shots are usually not lethal, making precision mandatory. Rarer than Bolt-Action, making it a trophy weapon.
Shotguns dominate close-range engagement. They use 12-gauge ammunition and come in several varieties. Most shotguns are unreliable outside point-blank range, but at 5 to 10 meters, they will delete enemies instantly. They are force multipliers in tight spaces.
![]() Waterpipe Shotgun (125 wood + 75 metal frags, no blueprint required)
Waterpipe Shotgun (125 wood + 75 metal frags, no blueprint required)
Magazine: 1 shell. Reload: must reload after every shot. A point-blank shot with buckshot can one-hit most players in one shot. An ambush weapon and door-camp weapon. The single-shot nature forces you into ambush tactics. Miss once and you are dead. Hit once and the enemy is dead. Risk-reward is extreme.
When to use: Wipe day door-camp. Ambush plays. Desperation weapon. Free to craft with starting resources. Some players intentionally carry a Waterpipe as a surprise weapon even when geared because the one-hit potential is devastating. Excellent for solo play against geared groups.
![]() Double Barrel Shotgun (175 metal frags + 2 pipe, Workbench Level 1)
Double Barrel Shotgun (175 metal frags + 2 pipe, Workbench Level 1)
Magazine: 2 shells. Reload: long reload after both shots are fired. The Double Barrel can fire both shells in rapid succession. Two quick shots at point-blank range drop almost anyone. After those two shots, the long reload forces you to switch weapons or fall back. Best used as an opening weapon: fire both barrels at close range, then switch to a secondary rifle or SMG.
When to use: Early-game ambush. Opening weapon in base defense. Monument raids where you know you will encounter close-quarters enemies. Excellent paired with a secondary rifle. Devastating in door-camps.
![]() Pump Shotgun (200 metal frags + 5 HQM + 1 pipe + 1 spring, Workbench Level 2)
Pump Shotgun (200 metal frags + 5 HQM + 1 pipe + 1 spring, Workbench Level 2)
Magazine: 6 shells. Fire rate: manual pump between shots. Ammunition types: buckshot (close-range), slugs (medium-range), incendiary shells (area denial). With buckshot, devastating at close range. With slugs, becomes a makeshift medium-range weapon effective at 30 to 50 meters. The versatility and 6-round magazine make it the best craftable shotgun. A staple of mid-game loadouts. Faster than double barrel.
When to use: Mid-game primary for close-quarters. Excellent for base defense where you control tight hallways. Monument raids with indoor sections. Pair slugs for longer range coverage. Incendiary rounds for area denial in choke points. All-around best shotgun for versatility.
![]() SPAS-12 (found in crates, not craftable)
SPAS-12 (found in crates, not craftable)
Magazine: 6 shells. Fire rate: semi-automatic, no pump action between shots. The SPAS-12 is the best shotgun in the game. Semi-automatic fire means faster time-to-kill than the Pump. The 6-round magazine provides more ammunition before needing to reload. Semi-auto accuracy is tight, allowing for shot grouping at medium range. Reload speed is fast compared to Pump.
When to use: Late-game close-quarters weapon. Monument raids. Base defense. Any situation where you expect indoor fights. If you find a SPAS in crates, prioritize it over other shotguns. The semi-auto fire rate is the defining advantage. Worth keeping as primary weapon late-wipe.
Attachments customize weapons for specific scenarios. The right attachment changes engagement distance significantly.
| Attachment | Effect | Best Weapons | When to Use |
|---|---|---|---|
| Muzzle Boost | Increases fire rate, adds recoil | Shotguns, SMGs | Close-range where DPS matters more than accuracy |
| Muzzle Brake | Reduces recoil but increases aimcone | None recommended | Rarely used. Increased spread usually hurts more than recoil reduction helps |
| Silencer | Removes sound and muzzle flash, lowers damage and range | Sniper rifles, SMGs | Stealth plays, night raids, suppression without alerting others |
| Laser Sight | Reduces aimcone for tighter bullet groupings | Any weapon where accuracy matters | Rifles, SMGs. Downside: visible laser gives away position |
| Flashlight | Provides light and can blind enemies | Night raids, indoor fighting | Dark environments where visibility is limited. Useful for team raids |
| Holosight | Clean optic for close-to-mid range | SMGs, pistols, SAR | Standard for PvP. Good for 0 to 75 meter range |
| 8x Zoom Scope | Magnifies view for long-range | Bolt, L96, SAR for tap-firing | Long-range engagements 100+ meters. Essential for sniper rifles |
| 16x Zoom Scope | Extreme magnification for ultra-long range | Bolt, L96 | Rare. Used for extreme distance holding |
Laser Sight is the most universally useful attachment for weapons where accuracy matters. The visible laser is a downside but the tighter groupings are worth it. Scope choice depends on engagement distance. Holosight for 0 to 75 meters. 8x for 75 to 300 meters. Beyond 300 meters, bolt or L96 becomes impractical due to drop.
5.56 Ammunition (Rifles and most guns)
Standard 5.56: your default ammunition. Cheap to craft, effective for general use. High Velocity 5.56: faster bullet speed, less drop, slightly lower damage. Better for long-range accuracy. Explosive 5.56: deals splash damage, primarily used for raiding rather than PvP. Expensive and not worth using in normal fights. The splash radius is small and damage is lower than standard rounds. Incendiary 5.56: sets targets on fire. Niche for area denial in specific scenarios.
Pistol Ammunition
Standard pistol ammo is cheap and universal. Used by revolvers, P250, M92, SMGs, and Thompson. High Velocity pistol rounds for slightly better range, though most fights with pistols are close enough that standard ammo suffices. Keep standard rounds as primary.
12-Gauge Shotgun Ammunition
Buckshot: your default close-range option. Multiple pellets spread for a large blast radius. Slugs: single large projectile. Turns shotgun into medium-range weapon with no spread. Handmade shells: budget option with reduced range and damage. Incendiary shells: sets targets on fire. Useful for area denial in specific choke points.
Arrows (Bow ammunition)
Wooden arrows: free, renewable. Bone arrows: stronger, requires bone fragments. Broadhead arrows: cause bleed damage. Arrows stack high in inventory.
Early Wipe (First 2 hours)
Primary: Crossbow or Hunting Bow. Secondary: Eoka Pistol or rock. Strategy: avoid fights when possible. Use stealth and distance to your advantage. Get to 50 wood, 50 cloth, and a base before engaging. Focus on farming, not fighting.
Mid-Wipe (2-6 hours)
Primary: SAR or Thompson. Secondary: Double Barrel or Revolver. Strategy: roaming for monuments and player interaction. The Thompson is forgiving for spray learning. SAR is consistent and reliable. Begin engaging other players confidently.
Late Wipe (6+ hours)
Primary: AK plus MP5 as secondary. Alternative: LR-300 if AK spray is not practiced. Sniper: Bolt or L96 for holding angles. Strategy: team-based plays, raids, structured PvP encounters.
Base Defense Loadout
Primary: Pump Shotgun or SPAS. Secondary: Rifle (SAR or AK). Ammo: lots of shotgun shells and rifle ammo. Position yourself in tight hallways where shotgun dominates. Secondary rifle for enemies trying to approach from distance. Barricades help control engagement range.
Monument Farming Loadout
Primary: SAR or MP5. Secondary: Pistol. Light ammo and food. Strategy: maximize movement speed and inventory space for loot. Avoid overkilling monuments with AK gear early wipe. Efficiency matters more than maximum firepower.
As your Rust skill improves, your weapon proficiency should improve alongside it. Early players should focus on learning bow mechanics and tap-firing with SAR. Mid-tier players should master the Thompson spray and compound bow accuracy. Late-tier players should dedicate serious practice to AK spray patterns and bolt-action positioning.
Each weapon has a skill ceiling. The Crossbow is simple. The AK requires dozens of hours of practice and research with blueprints. See our workbench guide for crafting timelines for each weapon tier.
The best weapon is always the one that matches your situation. Close-quarters at a monument? SMG or Shotgun. Open field? Rifle. Long-range defense? Bolt or L96. Outnumbered? MP5 for hip-fire accuracy and mobility. Experienced players do not have a favorite gun. They have a loadout for every situation and switch accordingly.
Bringing an AK to a green card monument on a quiet server wastes resources. Running a crossbow to Large Oil Rig is suicide. Read the situation. Check server population. Assess threat level. Gear accordingly. Flexibility in loadout is a skill itself.
Learn to quickly swap between weapon roles. Carry backup ammunition for multiple weapons. Use weapon comparison tools to optimize your selection. For raiding strategies that depend on specific weapons, see our comprehensive raiding guide and raiding tools guide. Check Launch Site and Outpost guides for monument-specific weapon recommendations.